Introduction
Connecting to Wi-Fi looks simple from the user side. A phone shows nearby networks, the user selects a Wi-Fi name, enters the password, and internet access starts within a few seconds.
Behind that simple action, several network steps happen in a specific order. Some steps allow the device to join the wireless network, while later steps allow it to communicate with websites and internet servers.
Overview of Wi-Fi Joining Flow
When a device joins a Wi-Fi network, it does not directly jump to internet communication. It first becomes part of the local wireless network, gets IP configuration, and then starts higher-layer communication.
A clean high-level flow looks like:
The device discovers a Wi-Fi network.
The client authenticates with the access point.
The client associates with the access point.
A security handshake establishes encryption keys.
The client obtains an IP address using DHCP.
The client resolves the gateway's MAC address using ARP.
The client resolves the domain name using DNS.
A TCP connection is established with the server.
HTTP communication begins.
The early steps are mainly wireless Layer 2 operations. DHCP, ARP, DNS, TCP, and HTTP happen after the device is already connected to the local Wi-Fi network.
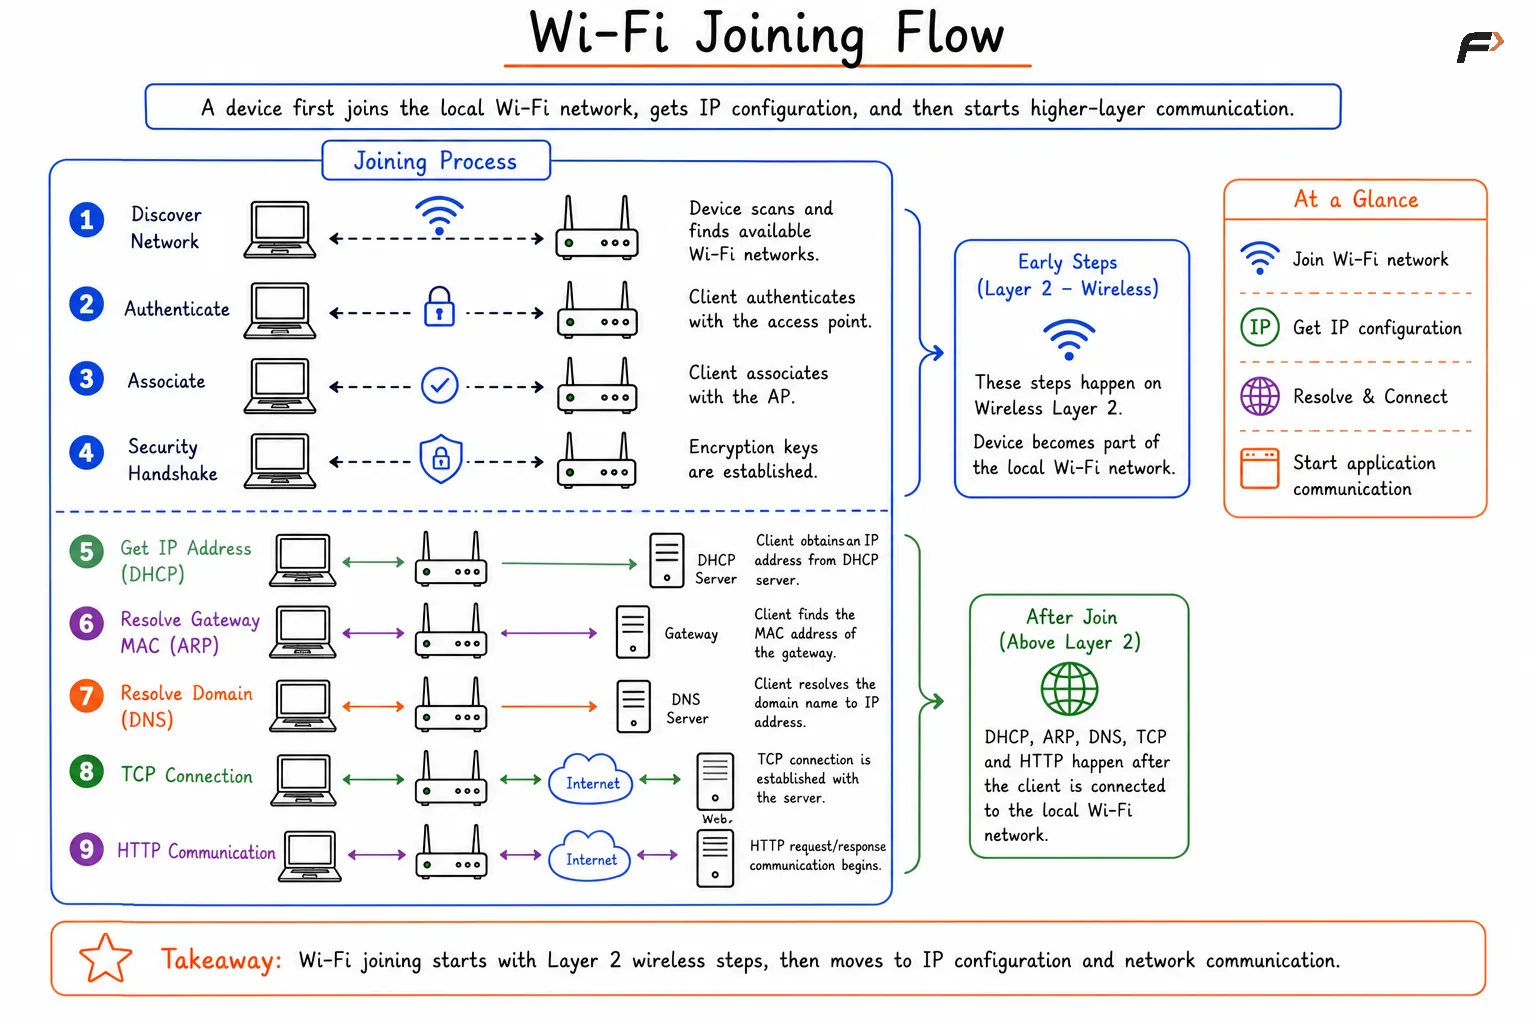
Wi-Fi Joining Flow
Step 1: Discovering Nearby Wi-Fi Networks
Before connecting, the device must discover which Wi-Fi networks are available nearby. This process is called Wi-Fi scanning or Wi-Fi discovery.
During discovery, the device learns details such as:
SSID: The Wi-Fi network name shown to users.
BSSID: The unique identifier of a specific access point.
Channel: The wireless channel used by the access point.
Signal strength: How strong the access point signal appears.
Security capability: Whether the network uses WPA2, WPA3, or another security method.
Supported rates: The data rates and wireless capabilities supported by the access point.
Wi-Fi discovery can happen through passive scanning or active scanning.
Passive and Active Scanning
In passive scanning, the device listens for beacon frames. Beacon frames are periodic announcements sent by access points to advertise their presence.
A beacon frame tells nearby devices that a Wi-Fi network exists and includes information such as SSID, BSSID, channel, security settings, and supported capabilities.
In active scanning, the device sends probe requests. A probe request is like asking nearby access points whether a specific network is available. Access points that match the request reply with probe responses.
Scanning Type | How It Works | Common Frame |
|---|---|---|
Passive scanning | Device listens for AP announcements | Beacon frame |
Active scanning | Device asks nearby APs for network information | Probe request and probe response |
Modern phones and laptops often scan in the background, which is why Wi-Fi networks appear quickly when settings are opened.
Step 2: Selecting an Access Point
After discovering nearby networks, the device chooses which access point to connect to. In a home network, this may be simple because there is usually one router.
In an office or campus, many access points may broadcast the same SSID. The device may choose one based on signal strength, security settings, frequency band, access point capability, and previous connection history.
For example, a network named TUF-Office-WiFi may be visible as one Wi-Fi name, but several access points across different floors may advertise it. The device selects the best available access point and begins the joining process.
Step 3: 802.11 Authentication
After selecting an access point, the device performs 802.11 authentication. This step checks whether the access point is willing to continue communication with the client.
A common confusion is assuming that Wi-Fi password checking happens here. In most modern WPA/WPA2/WPA3 networks, password verification happens later during the security handshake, not during basic 802.11 authentication.
Authentication: The client asks whether it can proceed with the access point.
Password verification: Happens later during the WPA/WPA2/WPA3 security process.
Purpose: Authentication prepares the client for association, but it does not fully connect the device yet.
Step 4: Association
After authentication, the device performs association. Association formally registers the wireless client with the access point.
During association, the access point accepts the device, records its information, agrees on supported capabilities, and prepares to forward wireless frames for that client.
Step | Meaning |
|---|---|
Authentication | Can this client proceed? |
Association | This client is now joined to this access point |
Security handshake | Can both sides prove the shared secret and create encryption keys? |
Step 5: Security Handshake
In secured Wi-Fi networks, the client and access point perform a security handshake after association. In WPA/WPA2/WPA3 networks, this process helps verify the shared secret and establish encryption keys.
The Wi-Fi password itself is not sent directly through the air. Instead, both sides use cryptographic steps to prove they have the correct secret and derive keys for encrypted communication.
After this step:
Encryption keys are created: Wireless data can be protected.
The password is not sent directly: The network avoids exposing the password over the air.
Traffic becomes secure: Captured wireless frames should not be readable without the proper keys.
At this point, the device has joined the Wi-Fi network at Layer 2. However, it still needs IP configuration before it can access the internet properly.
Step 6: Getting IP Configuration Using DHCP
After joining Wi-Fi, the device needs network configuration. It needs an IP address, subnet mask, default gateway, and DNS server information.
Most networks use DHCP to assign this automatically.
The DHCP process is commonly remembered as DORA:
Discover: The client searches for a DHCP server.
Offer: The DHCP server offers network settings.
Request: The client requests the offered configuration.
Acknowledge: The server confirms the assignment.
Now the device has the basic IP information required for network communication.
Step 7: Finding the Gateway MAC Using ARP
If the device wants to reach a website on the internet, it must send packets outside the local network. The default gateway handles this job.
The device knows the gateway IP address from DHCP, but local delivery still requires a MAC address. To find the gateway’s MAC address, the device uses ARP.
The device broadcasts a question like: Who has 192.168.1.1?
The router replies with its MAC address. The device stores this mapping in its ARP cache and can now send frames toward the gateway.
Step 8: DNS, TCP, and HTTP
After the device has Wi-Fi connectivity, IP configuration, and gateway information, normal internet communication can begin.
If the user opens a website, the device usually performs these steps:
DNS resolution: Converts a domain name such as
www.example.cominto an IP address.TCP connection: Establishes a reliable connection with the server using a three-way handshake.
HTTP or HTTPS request: The browser sends a request for the webpage or resource.
Server response: The server returns the requested data.
Rendering: The browser displays the webpage to the user.
If HTTPS is used, TLS also protects the communication between the browser and the server.
Joining Wi-Fi vs Accessing Internet
Joining Wi-Fi and accessing the internet are related, but they are not the same thing.
A device can successfully connect to a Wi-Fi access point and still fail to access the internet if DHCP fails, the gateway is unreachable, DNS does not work, or the internet connection behind the router is down.
This difference is important because “connected to Wi-Fi” only means the device has joined the local wireless network. Internet access needs additional steps after that.
Summary
When a phone or laptop joins a Wi-Fi network, it first discovers nearby access points using beacon frames and probe requests. It then selects an access point, performs authentication, associates with the network, and completes the WPA/WPA2/WPA3 security handshake to establish encryption.
After joining the wireless network, DHCP provides IP configuration, ARP finds the gateway MAC address, DNS resolves website names, TCP establishes reliable connections, and HTTP or HTTPS carries application data. What looks like one tap on a Wi-Fi network is actually a coordinated flow across multiple networking layers.
Be the first to add a comment.